
7-Step Guide to Installing Pavers: How to Lay Patio Pavers Step by Step
Do you want to install pavers on your patio but don’t know how? Don’t worry, we’ve got you covered! In this blog post, we will walk you through the steps of installing patio pavers. We’ll go over everything from preparing the surface to adding the finishing touches. By following our guide step by step, you’ll be able to lay your own patio pavers in no time!
1. Planning and Layout of the Patio
The first step in paving your driveway is to plan the area. Decide where your pavers will go and whether there is enough room for them. Using graph paper, you may develop and measure a plan.
Lay down your patio layout with a hose or some wood to form the shape of your paved area. After that, draw or spray paint the outline, approximately eight inches outside of it.
Consider the slope or gradient of the region. Water must run off pavers to avoid pooling or ponding, which can cause long-term pavement damage.
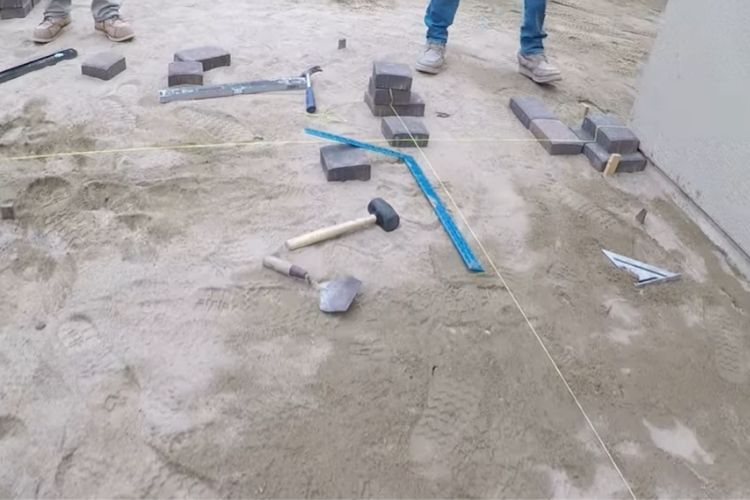
2. What You Need for Paving
Crushed stone approx. 0-2.5 inches for the frost protection layer according to the previously mentioned guidelines.
Crushed stone approx. 0-1.26 inches for fine grading according to the previously mentioned guidelines.
Washed crushed sand/chippings mix 0.08-0.31 inches for the bedding. Jointing sand (crushed sand/chippings mixture 0-0.16 inch made of dolomite fine crushed aggregate) and paving stones; edge stones and possibly step stones, if necessary paving drain concrete for bonded areas.
Shovel, wheelbarrow, 2 shaped pipes, broom, cord, aluminum lath, construction angle, spirit level; possibly pressure-free plastic hammer for curbstones and step stones, sufficiently long hose with shower attachment, water connection.
Heavy vibratory plate for base course compaction. Vibratory plate > 880 lb for car loading, use vibratory road roller for base courses for regular truck loading (for the final compaction on the surface of the pavers use vibratory plate >550 lb for car loading and >880 lb for truck loading, in each case with plastic sliding plate), stone splitter.
A working temperature of at least +41 °F for several days (laying on frozen substrates or with frozen materials is not permitted).
3. Excavation

The excavation should be approx. 11.8 inches wider than the final paved surface. The subgrade (excavation base) must have a slope of 2% for surface drainage. The subgrade (excavation base) must be compacted to a stable level (e.g. with a vibratory roller). In the case of clay and mixed soils (= cohesive and non-cohesive soils mixed) in the subsoil, a fleece is to be laid on the excavation base to prevent later frost heaving and non-consolidation due to grader claying, which makes the grader watertight, and to ensure lateral drainage via a longitudinally laid drainage pipe by surrounding it with drainage gravel and filter fleece. Place the 0-2.6 inch gravel in layers and compact, e.g. with a vibratory roller (max. 7.87 inch per layer!). The thickness of this frost protection layer should be 11.8 – 27.55 inches, depending on the local conditions and the load on the surface (frost depth), and must be executed on the upper side at the slope of the paved surface. On top of this, an approx. 3.9-inch thick fine leveling layer of crushed stone 0-0.63 inch is applied and compacted well, e.g. with a vibratory roller or heavy vibratory plate. The surface should be filter-stable in relation to the subsequent bedding material. Filter-stable means that the bedding sand does not trickle into the base layers or is washed in by water. The fine levelling must be produced exactly to +/- 0.4 inches so that the sand bed has an approximately equal thickness of max. +/- 0.4 inch and uneven settlements are avoided (check by means of aluminum lath; final height of the pavement = frost protection layer + fine levelling + sand bed + pavement – 0.4-inch compaction dimension of the bedding). Therefore, with respect to fixtures such as manhole covers, etc., allow for at least 0.6-inch protrusion of the top edge of the surface before vibration, and 0.08-0.3 inch for washed crushed sand/chip mix. This projection is reduced to less than 0.2 inches by vibration and recompaction of the bedding.
You can considerably increase the load-bearing capacity and durability of a paved surface if you take advantage of the arching effect and form the paved surface in the shape of an arch. The effect is that mainly compressive stresses occur in the surface, which can be more easily absorbed by the structure than tensile stresses. This type of construction requires vaulting from the top edge of the existing subgrade, i.e. all base courses, the bedding and the stones.
4. Edge Restraints
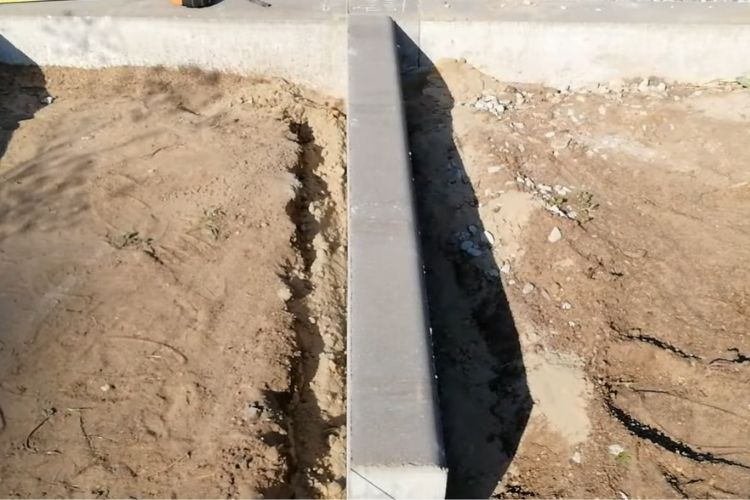
Side edging ensures that the paving stones do not migrate at the edge. Ideally, it is done in a matching design with block stones (natural or antique), wall stones, palisades, or bed edging stones. All four systems provide enough height for the adjacent lawn to keep it from withering. Set the stones in an excavated trench in paving drain concrete placed 3.9-7.87 inches high. Alternatively, nail edging stones directly into the fine grading and subgrade.
5. Preparation of Setting Bed for Pavers

Place the molded tubes on the fine leveling and fill them in between with the bedding material. Then pull the aluminum lath over the molded tubes to create a uniformly strong, level bedding. After removing the mold tubes, fill the resulting void with the bedding material. Do not compact or walk on the finished bedding. Do not make larger bedding than you can lay paving stones in one day. Important: use only low-calcium (prevents settling and efflorescence), washed (prevents frost damage) and grit-graded material (is filter-stable to prevent the joint sand from trickling or washing into the sand bed)!
6. Laying Paving Stones

Start in a corner – if possible at the lowest point of the surface and at right angles. Tighten a string to ensure that the paving stones are laid flush. Now lay the paving stones upside down (= from the laid surface) without stepping on the sand bed.
Lay square or maximum rectangular formats with an aspect ratio of W:L = 2:<3 and H:L = 1:<4 diagonally to the main direction of travel. This increases the number of load-transmitting stone side faces, which results in lower stone stresses within the face, making the same stones more loadable. Avoid cross joints!
When laying the stones, make sure that the all-round joint is 0.08-0.3 inches wide, depending on the stone system and the laying instructions. Only with stones laid in this way (without direct concrete contact between the stones and the spacers) is it possible to remove and re-lay the same stones, e.g. in the event of a pipe bursting under the paved area. The approx. 0.08 inch raised spacers often formed on the sides of our stones are not a standard measure for the joint width, but help to avoid situations where stones lie against each other over the entire surface without a minimum joint. The joint transmits and compensates for stresses occurring due to loads from stone to stone via its filling – but only if the stones are not laid crisply and there is room for a joint filling!
Check the correct alignment of the joints every 6.6-9.8 ft using a string and realign the stones if necessary. Do not install any bricks with visible defects (transport damage, etc.). For adjustment work on shafts, walls, etc., the stones must be cut to size using suitable equipment (e.g. stone splitter, stone cutting saw). For reasons of appearance – and the stability of the surface edges and thus of the entire surface – no patchwork of small slips and gusset stones should be laid at the edge. The smallest stone length and width of the curbs should be at least half of the stone length and width of the main format within the area. The laid surface may be walked on for laying purposes. Important: Ensure slope by means of aluminum lath and spirit level.
Lay the tops of the stones at least 0.6 inches above the level of fixtures (manhole covers, etc.), 0.08-0.3 inches for washed crushed sand/chip mix. This superelevation is reduced to less than 0.2 inches by vibration and compaction of the bedding.
7. Filling of Joints with Sand and Compaction
Unbound material is to be used for joint filling. Joint sand is suitable, or for pavements with larger joint widths, which are intended for high water permeability, a crushed sand/chip mixture of 0.08-0.31 inches.
Always use low-lime jointing material (e.g. quartz crushed sand), as this helps to prevent efflorescence. Pour jointing sand onto the surface, sweep in thoroughly, sweep off the surface and slurry with plenty of water and wait for the stone surface to dry. When dry, vibrate at least once with a suitable vibrating plate (not with vibrating roller!). Start along the edges and work in circles towards the center of the surface. To protect the stone surface from scratch marks and edge chipping
use a vibrator with plastic sliding plate. Then thoroughly sweep in joint sand again, sweep off the surface and slurry it. The surface can be used and driven on immediately!
